1. Dilation and Scale Factor
Sign In
An error ocurred, try again later!
Chapter 2
1.
Dilation and Scale Factor
Dilation is a transformation that alters an object's size without changing its shape. Through the use of scale factors, one can either enlarge or reduce figures. This process, when combined with similarity principles, offers a method to understand and compare the proportionality of shapes. Grasping dilations and scale factors enables professionals, students, and educators to analyze geometric patterns more effectively, aiding in tasks ranging from design to theorem derivation. A solid foundation in these concepts provides an avenue to more advanced geometrical studies and applications.
Show less Show more expand_more 


Lesson Settings & Tools
| | 13 Theory slides |
| | 9 Exercises - Grade E - A |
| | Each lesson is meant to take 1-2 classroom sessions |
Dilation and Scale Factor
Slide of 13
This is the first lesson on dilations and similarities. In this lesson the properties of dilations will be explored to build the foundations to investigate similarities later.
Catch-Up and Review
Here are a few recommended readings before getting started with this lesson.
Although not directly used, it can be useful to recall the properties of reflections, rotations, and translations to help identify the differences and similarities of rigid motions and dilations.
Explore
Share
Report error
Investigating Dilations in the Real World
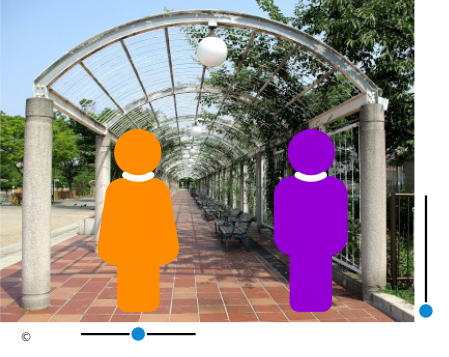
On the image you can see a photograph taken in Tennoji Park in Osaka, Japan.
- Move the sliders to move the orange figure on the left.
- Suppose you were to draw this image, standing in a different position than this image's photographer. How could you draw the image so that the two figures' heights always appear to be the same?
External credits: Laitche
Discussion
Share
Report error
Definition of a Dilation
When the vertical slider is moved on the previous applet, the transformation applied to the figure is called a dilation.
Concept
Share
Report error
Dilation
A dilation is a transformation that changes the size of a figure while keeping its shape the same. This transformation involves enlarging or reducing the figure by a certain length scale factor k from a fixed point O called the center of dilation. For example, the image of every point on a leaf lies on the ray that starts at the center of the dilation and passes through its preimage.
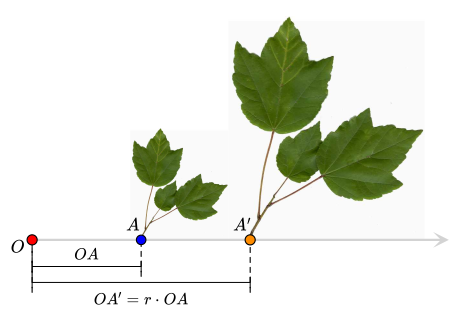 As shown in the diagram, O is the center of the dilation, k is the scale factor, A is the preimage, and A' is the image point. By definition, the scale factor k can also be defined as the ratio of a length in the image to the corresponding length in the preimage.
When the scale factor is greater than 1, the dilation is called an enlargement because the image is larger than the preimage. When the scale factor is between 0 and 1, the dilation is called a reduction because the image is smaller than the preimage.
As shown in the diagram, O is the center of the dilation, k is the scale factor, A is the preimage, and A' is the image point. By definition, the scale factor k can also be defined as the ratio of a length in the image to the corresponding length in the preimage.
When the scale factor is greater than 1, the dilation is called an enlargement because the image is larger than the preimage. When the scale factor is between 0 and 1, the dilation is called a reduction because the image is smaller than the preimage.
OA'=k * OA ⇔ k = OA'/OA
Explore
Share
Report error
Properties of a Dilation
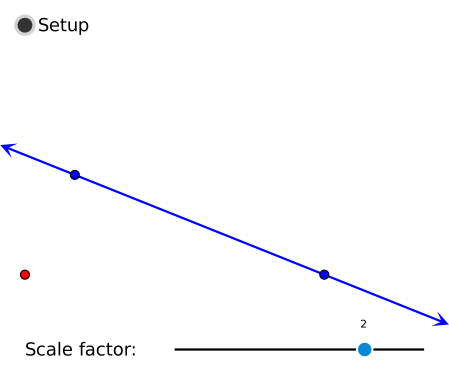
The following applet shows the images of points on a straight line. There are two modes in the applet, Setup
and Mark image
— complete the first to reach the next.
- In setup mode, set the scale factor, move the line, and slide the center of dilation as you please.
- Once done with the setup, move the point on the line to a different position. Then, mark the image point on the board. Mark multiple points.
- What do you notice about the image points?
Explore
Share
Report error
More Properties of a Dilation
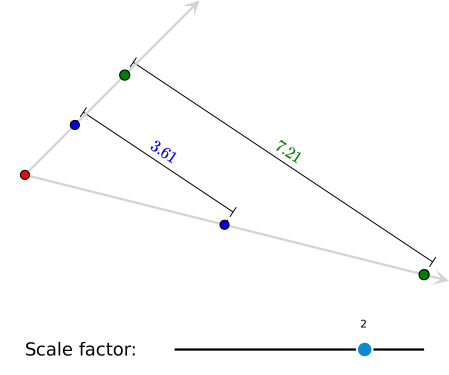
This applet shows the distance of two points (middle blue points) and the corresponding image points (further right green points).
- Move the center (furthest left red point), move the two middle points around, and slide the bar to change the scale factor.
- Is there a relationship between the two distances?
Discussion
Share
Report error
Summary of a Dilation's Properties
The following is a list of a few essential properties of dilations.
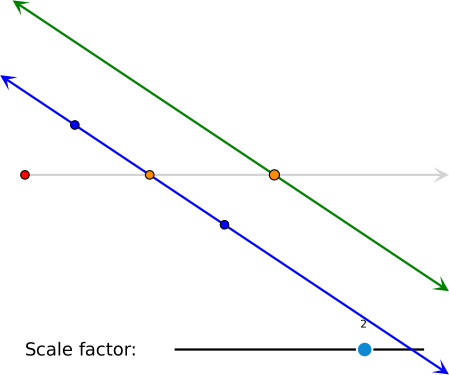
- The dilation of a line is a line.
Proof
The formal proof of this property is beyond the scope of this course. The applet below, however, gives an experimental verification.
- Move the line, the center of dilation, and set the scale factor.
- Move a point along the line and verify that the image points indeed form a line parallel to the preimage.
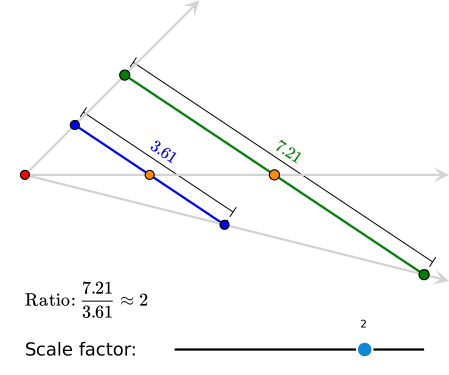
- The dilation of a line segment is a line segment. The image is longer or shorter than the preimage in the ratio given by the scale factor.
Proof
The formal proof of this property is beyond the scope of this course. The applet below, however, gives an experimental verification.
- Move the segment, the center of dilation, and set the scale factor.
- Move a point along the segment and verify that the image points indeed form a segment parallel to the preimage.
- Check also that the ratio of the length of the image and the length of the preimage is indeed the scale factor. Note that the displayed lengths are only approximate, so the ratio will only be approximately equal to the scale factor.
- Dilations preserve angle measures.
Proof
Let ∠ B'A'C' be the dilated image of ∠ BAC. According to the first property, AC is parallel to A'C' and AB is parallel to A'B'
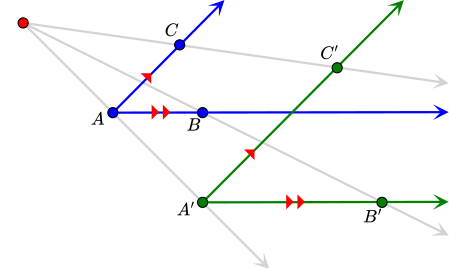
Let M be the intersection point of AB and A'C', and focus on the parallel legs AC and A'C'. According to the Alternate Interior Angles Theorem, angles ∠ MAC and ∠ AMA' are congruent.
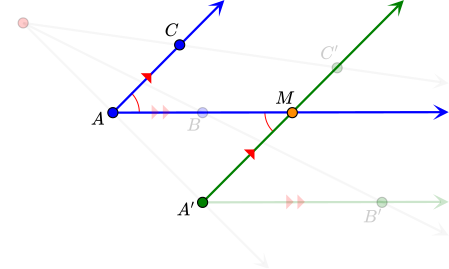
Similarly, since the other legs are also parallel, angles ∠ B'A'M' and ∠ AMA' are congruent.
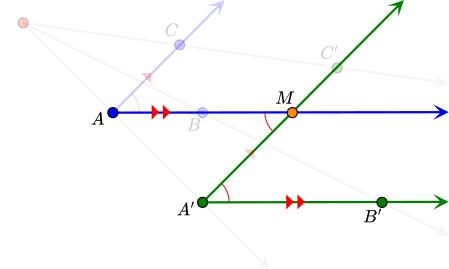
Since ∠ AMA' is congruent to both ∠ BAC and ∠ B'A'C', the transitive property of congruence implies that these two angles are congruent.
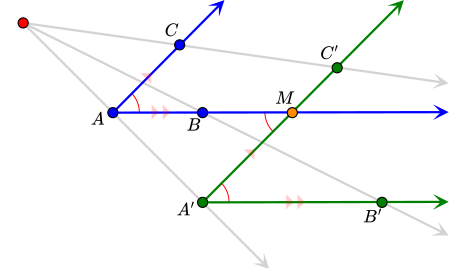
By the definition of congruence, this completes the proof that dilation preserves angle measures.
∠ BAC ≅ ∠ B'A'C' ⇓ m∠ BAC = m∠ B'A'C'
Illustration
Share
Report error
Dilating a Drawing
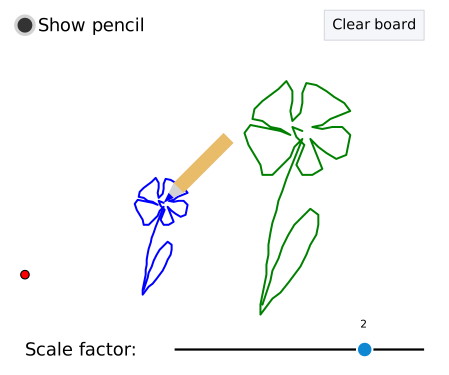
On the applet below you can experiment with dilations.
- Move the pencil to draw a curve.
- The red point is the center of dilation.
- Use the slider to set the scale factor.
Example
Share
Report error
Dilating a Quadrilateral
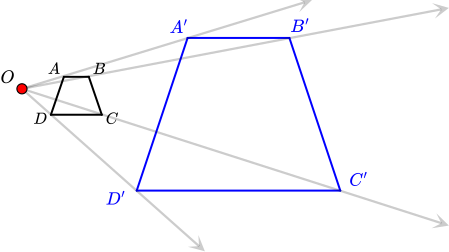
Consider the quadrilateral ABCD and the point O in the interior.
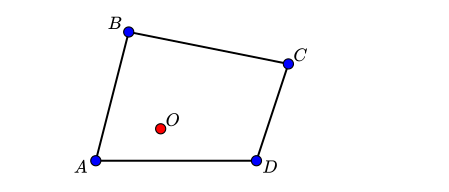
a Use O as a center and dilate the quadrilateral with scale factor 2.
b Use O as a center and dilate the quadrilateral with scale factor 0.5.
Answer
a 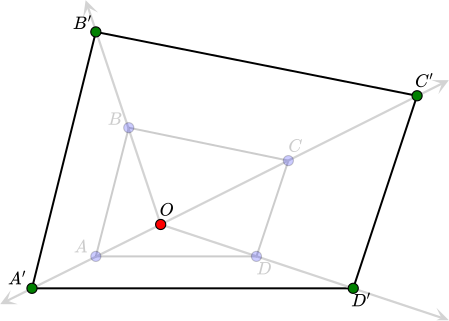
b 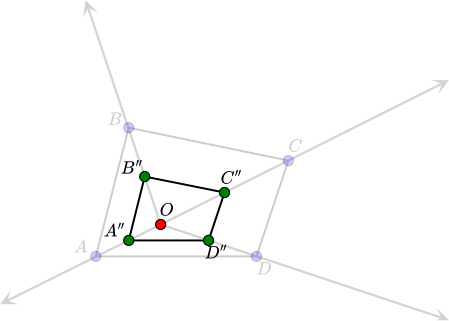
Solution
For both parts, the properties of dilation guarantee that the image is a quadrilateral, where the vertices are the images of the vertices of a quadrilateral ABCD. These image vertices are on the rays connecting the center of dilation with vertices A, B, C, and D.
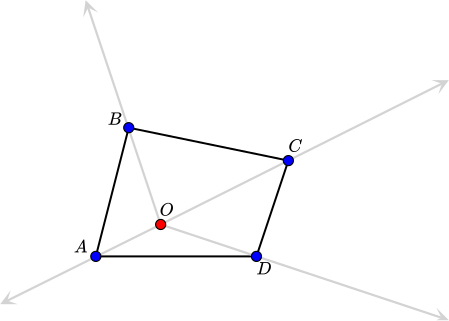
a For scale factor 2 the image points are twice as far from the center of dilation as the preimage.
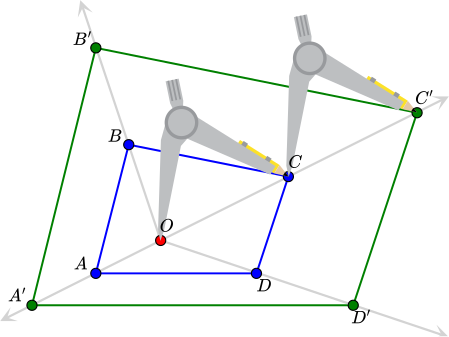
OA'&=2* OA OB'&=2* OB OC'&=2* OC OD'&=2* OD These points can be constructed using a compass. Copy the distance from the center to a vertex once on the ray beyond the original point.
B For scale factor 0.5 the image points are half the distance from the center of dilation as the preimage.
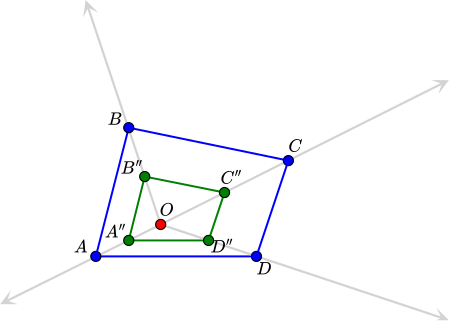
OA''&=1/2* OA OB''&=1/2* OB OC''&=1/2* OC OD''&=1/2* OD These points can be constructed as midpoints between two points.
Example
Share
Report error
Dilating a Logo
The larger logo is an enlarged image of the smaller one.

Answer
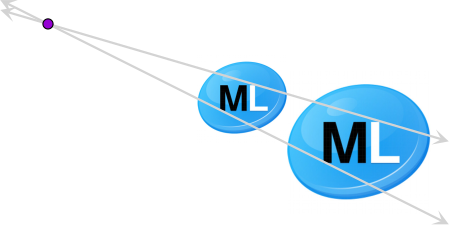
Scale factor: 1.6
Hint
Look for pairs of corresponding points on the two logos.
Solution
The center of dilation, a point, and the image of this point are on a straight line. Therefore, the center of dilation can be determined to be the intersection point of any two lines connecting a point and its image.
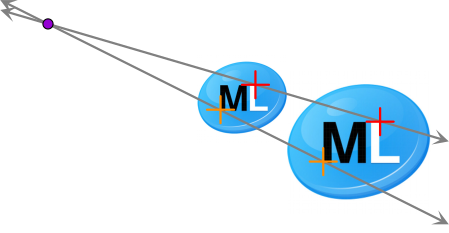
A ruler can be used to find the distance of any point and its image from the center of dilation.
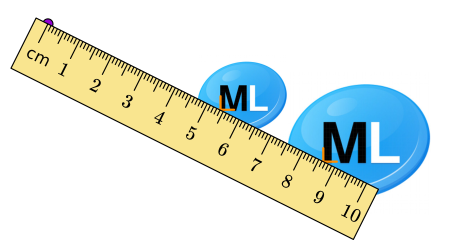
The distance from the center of dilation to the lower-left corner of the letter M on the preimage is 5.4 centimeters. The distance from the center of dilation to the corresponding image point is 8.6 centimeters. The scale factor is the ratio of these. Scale factor:8.6/5.4≈ 1.6
Pop Quiz
Share
Report error
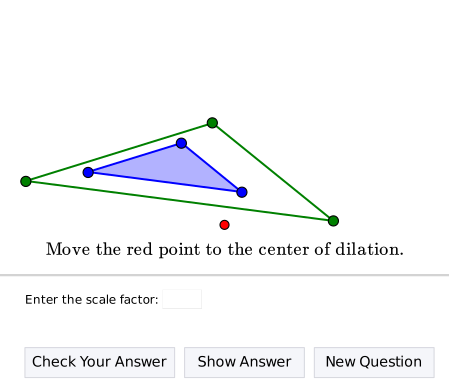
Practice Dilations
Example
Share
Report error
Dilating a Triangle in a Cooordinate Plane
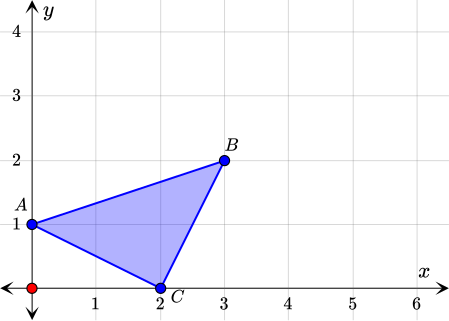
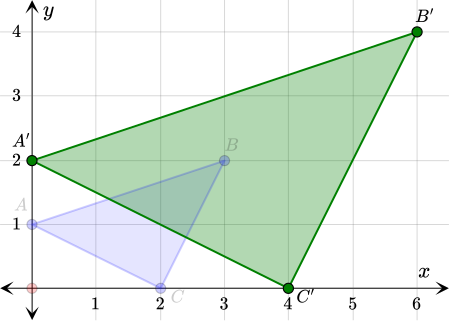
Use the origin as a center to dilate the triangle by a scale factor 2.
Answer
Hint
Use horizontal and vertical movements to copy distances.
Solution
The points on the coordinate axes stay on the coordinate axes while their distances, from the origin, double.
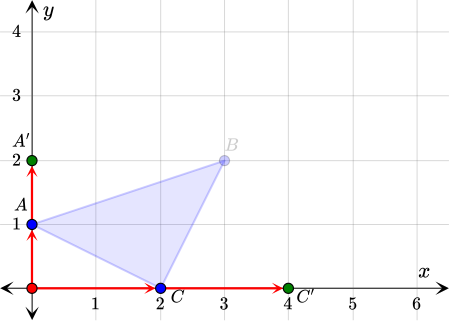
When moving the third vertex, notice that moving three units to the right and two units up from the origin gives the position of B. The same movement starting at B will end on the ray connecting the origin with B. This image point is twice as far from the origin as the preimage.
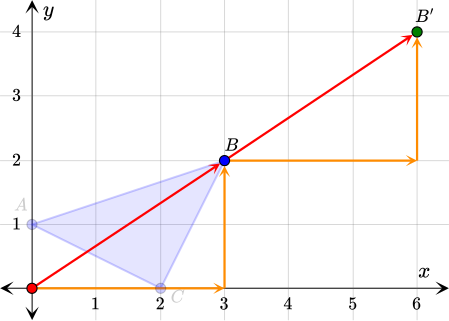
Connecting the images of the vertices gives the dilated triangle.
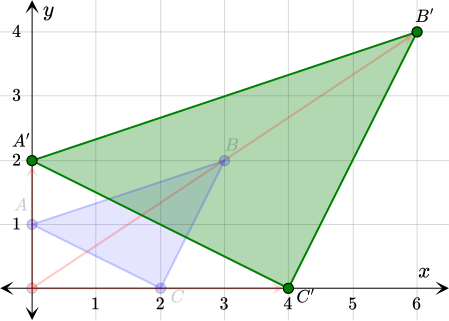
Since the center of the dilation is the origin and the scale factor is 2, the coordinates of the image point are double the coordinates of the preimage points. A(0,1) &→ A'(0,2) B(3,2) &→ B'(6,4) C(2,0) &→ C'(4,0)
Discussion
Share
Report error
Dilation Using a Straightedge and a Compass
The methods to construct the image of a point depend on the scale factor.
Dilation by an Integer Scale Factor
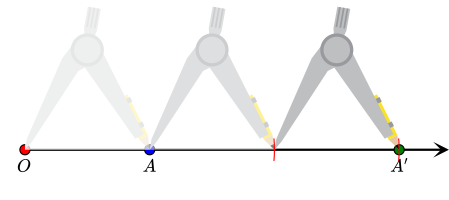
When the scale factor is an integer, a compass can be used to copy the distance between the center of dilation and the preimage point to find the position of the image.1
Draw a ray from the center of dilation through the preimage point
expand_more 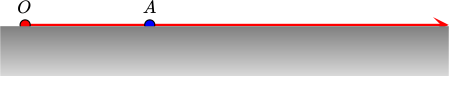
2
Measure the distance from the center of dilation to the preimage point
expand_more Use a compass to measure the distance from the center of dilation to the preimage point.
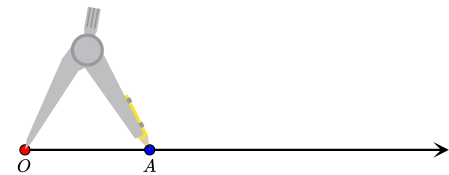
3
Copy the measured distance on the ray
expand_more Keep the same opening of the compass and copy the distance on the ray. If the scale factor is n, copy it n-1 times. OA'=n* OA The diagram illustrates the construction for scale factor 3, so the distance is copied twice from the preimage point.
Dilation by a Scale Factor 1/n
To construct the image when the scale factor is 1/n, the properties of dilation can be used.
1
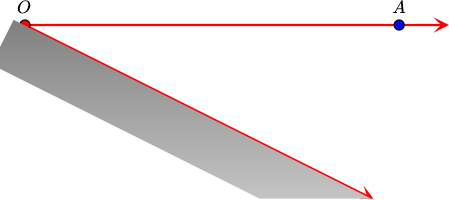
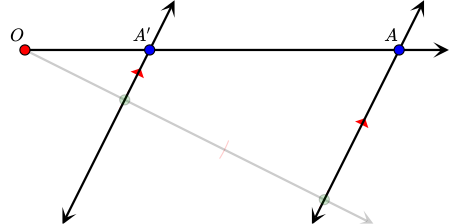
Draw two rays starting at the center of dilation
expand_more Use a straightedge to connect the center of dilation with the preimage point and draw a second ray starting at the center of dilation.
2
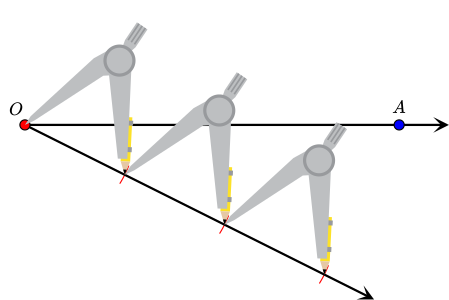
Copy the same distance on the second ray n times
expand_more Use a compass to copy the same distance n times on the second ray, starting at the center of dilation. The diagram illustrates the process when n=3.
3
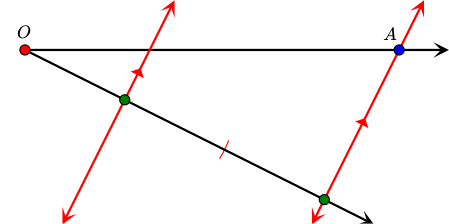
Construct parallel lines
expand_more Mark the first and last point on the second ray. Connect the last point with the preimage point and construct a parallel line through the first point.
4
Mark the image point
expand_more The intersection point of this parallel line with the first ray is the constructed image. OA'=1/n* OA
Dilation by a Scale Factor p/q
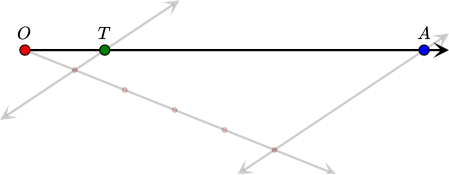
The combination of the previous two methods gives the dilation of a point by a scale factor p/q.
1
Dilation by a scale facor 1/q
expand_more First, construct the image using a scale factor 1/q. OT = 1/q * OA On the diagram q=5.
2
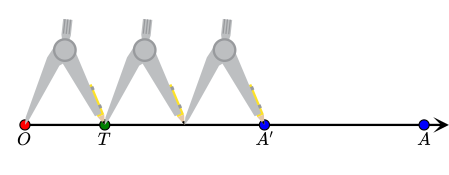
Dilation by a scale facor p
expand_more Copy the distance of this new point from the center of dilation p times, starting at the center of dilation. OA' = p* OT OT = 1/q* OA ⟹ OA' = p/q* OA The diagram below illustrates the dilation by scale factor 3/5.
Dilation of a Figure
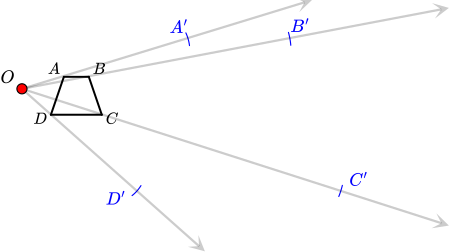
The dilation of a figure is the collection of all dilated points. The dilation of a polygon can be constructed by dilating the vertices and connecting the image points.1
Construct the image of the vertices.
expand_more Depending on the scale factor, choose the appropriate method to construct the image of the vertices.
2
Connect the image vertices.
expand_more Segments are drawn between the image vertices to create the image polygon.
Closure
Share
Report error
Investigating the Effects of Several Dilations
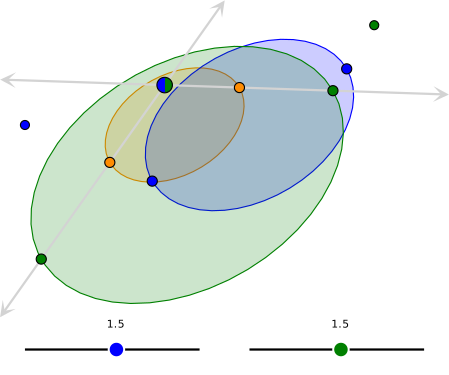
The following applet allows you to investigate the effect of applying two dilations one after the other. Use the sliders to adjust the scale factors and move the centers around.
- The center of the first dilation is blue, the center of the second dilation is green.
- The preimage is the orange ellipse. The first dilation maps this to the blue ellipse. The second dilation maps this blue ellipse to the green ellipse.
Notice that the combination of the two dilations can be replaced by one dilation.
- What is the scale factor of this dilation?
- Where is the center of this dilation?
- Is the combination always a dilation?
Dilation and Scale Factor
Exercise 1.1
Consider the polygon ABCDE.
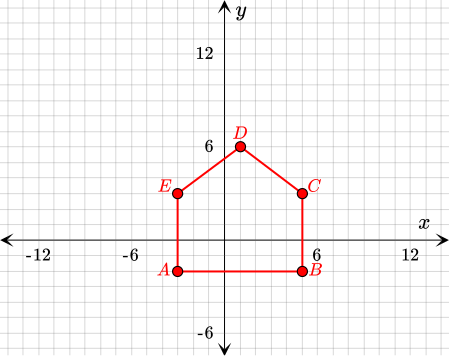
Dilate ABCDE from the origin by a factor of 2 forming A'B'C'D'E'.
{"type":"text","form":{"type":"point2d","options":{"comparison":"1","nofractofloat":false,"keypad":{"simple":true,"useShortLog":false,"variables":["x"],"constants":["PI"]},"rendered":false,"decimal":false,"function":false},"text":" "},"formTextBefore":"B'","formTextAfter":null,"answer":{"text1":"10","text2":"-4"}}
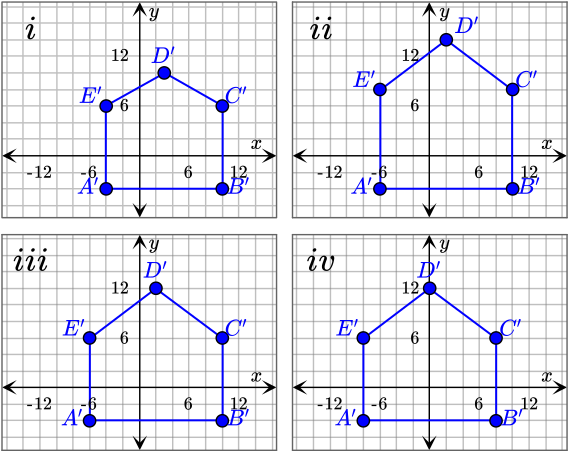
Which of the following diagrams shows the dilated figure.
{"type":"choice","form":{"alts":["i","ii","iii","iv"],"noSort":true},"formTextBefore":"","formTextAfter":"","answer":2}
security
report
code
security
report
code
To enlarge ABCDE by a scale factor of 2, we must double the distance between each vertex and the origin. This can be done if we multiply the coordinates of each point by 2. For Part A, we only have to do this for point B. ccc Point & (x,y) & (2 x, 2 y) [0.5em] B & (5,-2) & (10,-4) The dilated point B' has the coordinates (10,-4).
To determine the correctly dilated figure, we must identify the coordinates of the rest of the vertices. ccc Point & (x,y) & (2 x, 2 y) [0.5em] A & (-3,-2) & (-6,-4) C & (5,4) & (20,8) D & (1,6) & (2,12) E & (-3,4) & (-6,8) Now we can plot the dilated polygon.
Comparing A'B'C'D'E' to the given alternatives, we see that iii is the correct option.
security
report
code
For the dilation of A to A', find the scale factor k.
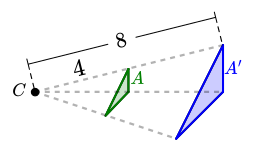
{"type":"text","form":{"type":"math","options":{"comparison":"1","nofractofloat":false,"keypad":{"simple":true,"useShortLog":false,"variables":["x"],"constants":["PI"]},"rendered":false},"text":" "},"formTextBefore":"k=","formTextAfter":null,"answer":{"text":["2"]}}
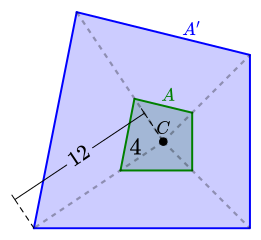
{"type":"text","form":{"type":"math","options":{"comparison":"1","nofractofloat":false,"keypad":{"simple":true,"useShortLog":false,"variables":["x"],"constants":["PI"]},"rendered":false},"text":" "},"formTextBefore":"k=","formTextAfter":null,"answer":{"text":["3"]}}
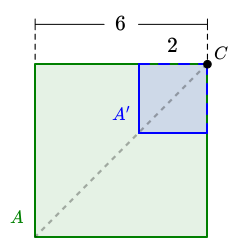
{"type":"text","form":{"type":"math","options":{"comparison":"1","nofractofloat":false,"keypad":{"simple":true,"useShortLog":false,"variables":["x"],"constants":["PI"]},"rendered":false},"text":" "},"formTextBefore":"k=","formTextAfter":null,"answer":{"text":["\\dfrac{1}{3}"]}}
security
report
code
security
report
code
From the exercise, we have been given the preimage A and the image A'. The scale factor of dilation can be determined by identifying corresponding points on the image and preimage.
If we divide the distance between C and the point on the image by the distance between C and the corresponding point on the preimage, we can determine the scale factor k. k= Distance to imageDistance to preimage Let's do this with the given lengths.
The scale factor is 2.
Like in Part A, we will identify corresponding points on the preimage and image.
As in Part A, we will divide the distance from the center of dilation and the point on the image, by the corresponding length between the center of dilation and the point on the preimage.
The scale factor is 3.
Let's repeat the procedure from previous parts and identify corresponding points.
Having identified corresponding points, we can identify the scale factor.
The scale factor is 13.
security
report
code
Which scale factor(s) create a dilation of AB that is shorter than AB? Select all that apply.
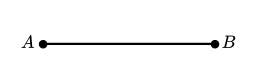
{"type":"multichoice","form":{"alts":["1\/3","1\/2","4\/3","1","7\/2"],"noSort":true},"formTextBefore":"","formTextAfter":"","answer":[0,1]}
security
report
code
security
report
code
A dilation is a transformation where a figure is either enlarged or reduced. That depends on the scale factor of the dilation. A scale factor between 0 and 1 produces a reduction, and a scale factor greater than 1 gives an enlargement. Therefore, the scale factors that result in a reduction are the following. $1/3$ $1/2$
security
report
code
In which section, 1-12, would you place the center of dilation when dilating P to P'?
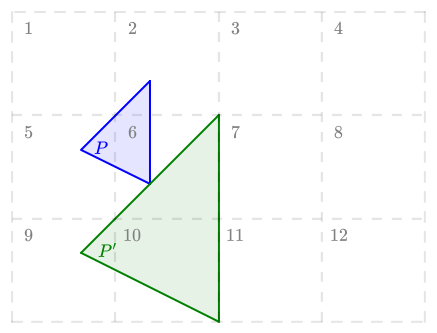
{"type":"text","form":{"type":"math","options":{"comparison":"1","nofractofloat":false,"keypad":{"simple":true,"useShortLog":false,"variables":["x"],"constants":["PI"]},"rendered":false},"text":" "},"formTextBefore":"Section","formTextAfter":null,"answer":{"text":["1"]}}
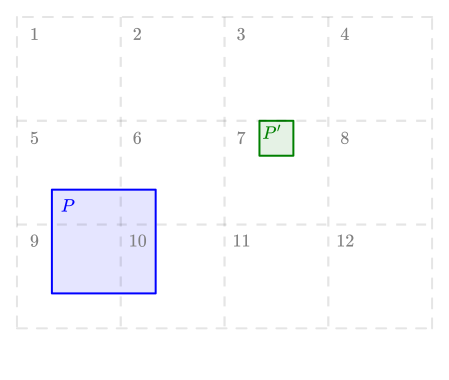
{"type":"text","form":{"type":"math","options":{"comparison":"1","nofractofloat":false,"keypad":{"simple":true,"useShortLog":false,"variables":["x"],"constants":["PI"]},"rendered":false},"text":" "},"formTextBefore":"Section","formTextAfter":null,"answer":{"text":["4"]}}
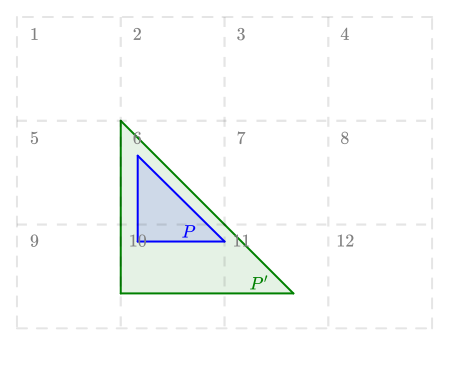
{"type":"text","form":{"type":"math","options":{"comparison":"1","nofractofloat":false,"keypad":{"simple":true,"useShortLog":false,"variables":["x"],"constants":["PI"]},"rendered":false},"text":" "},"formTextBefore":"Section","formTextAfter":null,"answer":{"text":["6"]}}
security
report
code
security
report
code
To determine the center of dilation, we should draw lines between corresponding points on the preimage and image. Where two of these lines — or more — intersect, we have the center of dilation. To draw one such line, we need to use a straightedge and a pencil.
Let's draw a second line between two more corresponding points.
As we can see, the center of dilation is in section 1.
Like in Part A, we will draw lines between corresponding points on the image and preimage. Where two of them intersect, we have our center of dilation.
Let's draw one more of these lines between two more corresponding points on the preimage and image.
The center of dilation is in section 4.
Let's repeat the procedure once more for Part C.
The center of dilation is in section 6.
security
report
code
Dilation and Scale Factor
Recommended exercises
To get personalized recommended exercises, please login first.
Loading content
≤
>
■2
■▢
e▢
7
8
9
×
÷■1
=
=
√▢
▢√
∫▢▢
4
5
6
+
−
≤
<
log
ln
log▢
1
2
3
()
∣
sin
cos
tan
0
.
π
x
y
Loading content